Set up the knowledge library: add documents and switch them on for calls
Last updated 20 November 2026
In the Knowledge Library you store what your assistant must know about your business: price lists, frequent questions, menus, service descriptions or pages of your website. When a caller asks for example "How much does a furniture lift cost?", the assistant looks it up in your documents during the call and answers with your details.
This guide shows, image by image, how to add a document and switch it on fully. The images come from a sample account («Panorama Umzüge», a removal company) and show the German dashboard; the German label is given in brackets. In your account you see your own business name.
In short: A document has an effect in calls only when three things are done: 1. It is created and shows the status Ready. 2. It is published (button Publish draft). 3. It is assigned to your assistant (button Manage assignments). If one of these steps is missing, your assistant does not know the document in the call. At the end, check with a test call.
What you need
- A login for the dashboard at rednea.ch/login with the Owner or Admin role. With the Viewer role you cannot add or change documents.
- Your content, for example as PDF, Word file (DOCX), text file (TXT) or Markdown, 15 MB at most per file. You can also type text directly or take over pages of your website.
- About 10 minutes.
Step 1: Open the knowledge library
Log in to the dashboard. In the left column, under Your assistant, click Knowledge. The Knowledge Library page opens.
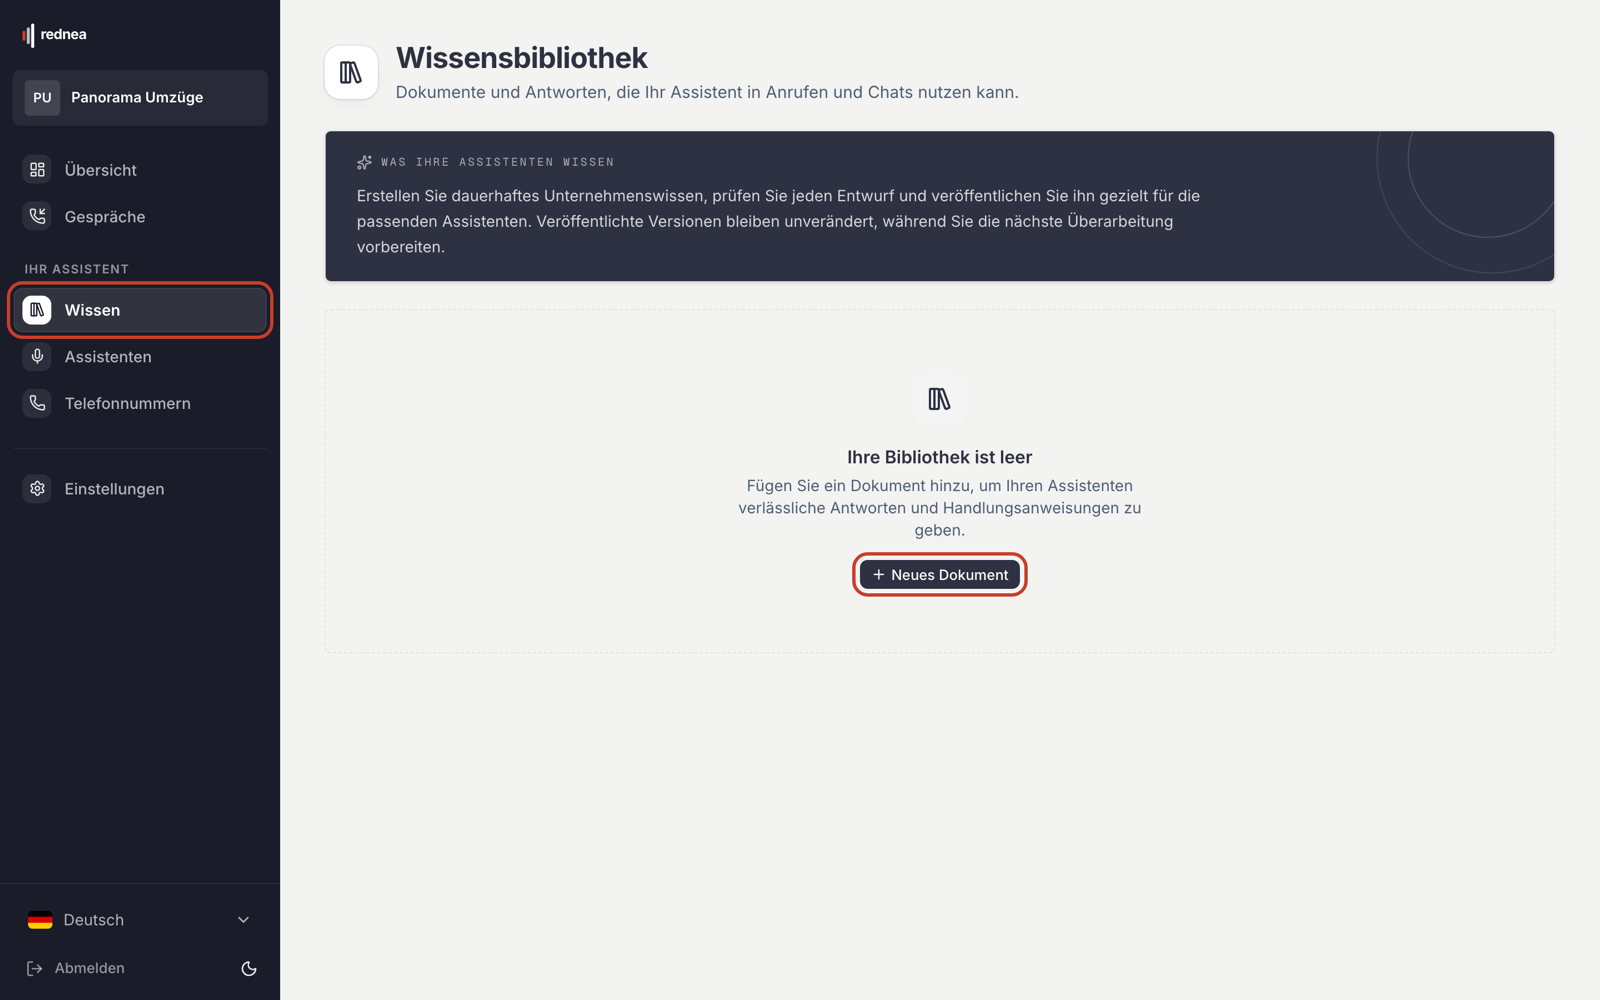
You do not see the "Knowledge" entry? The knowledge library is switched on per business. Write to us at info@rednea.ch. We switch it on for you. Then reload the page.
Step 2: Create a new document
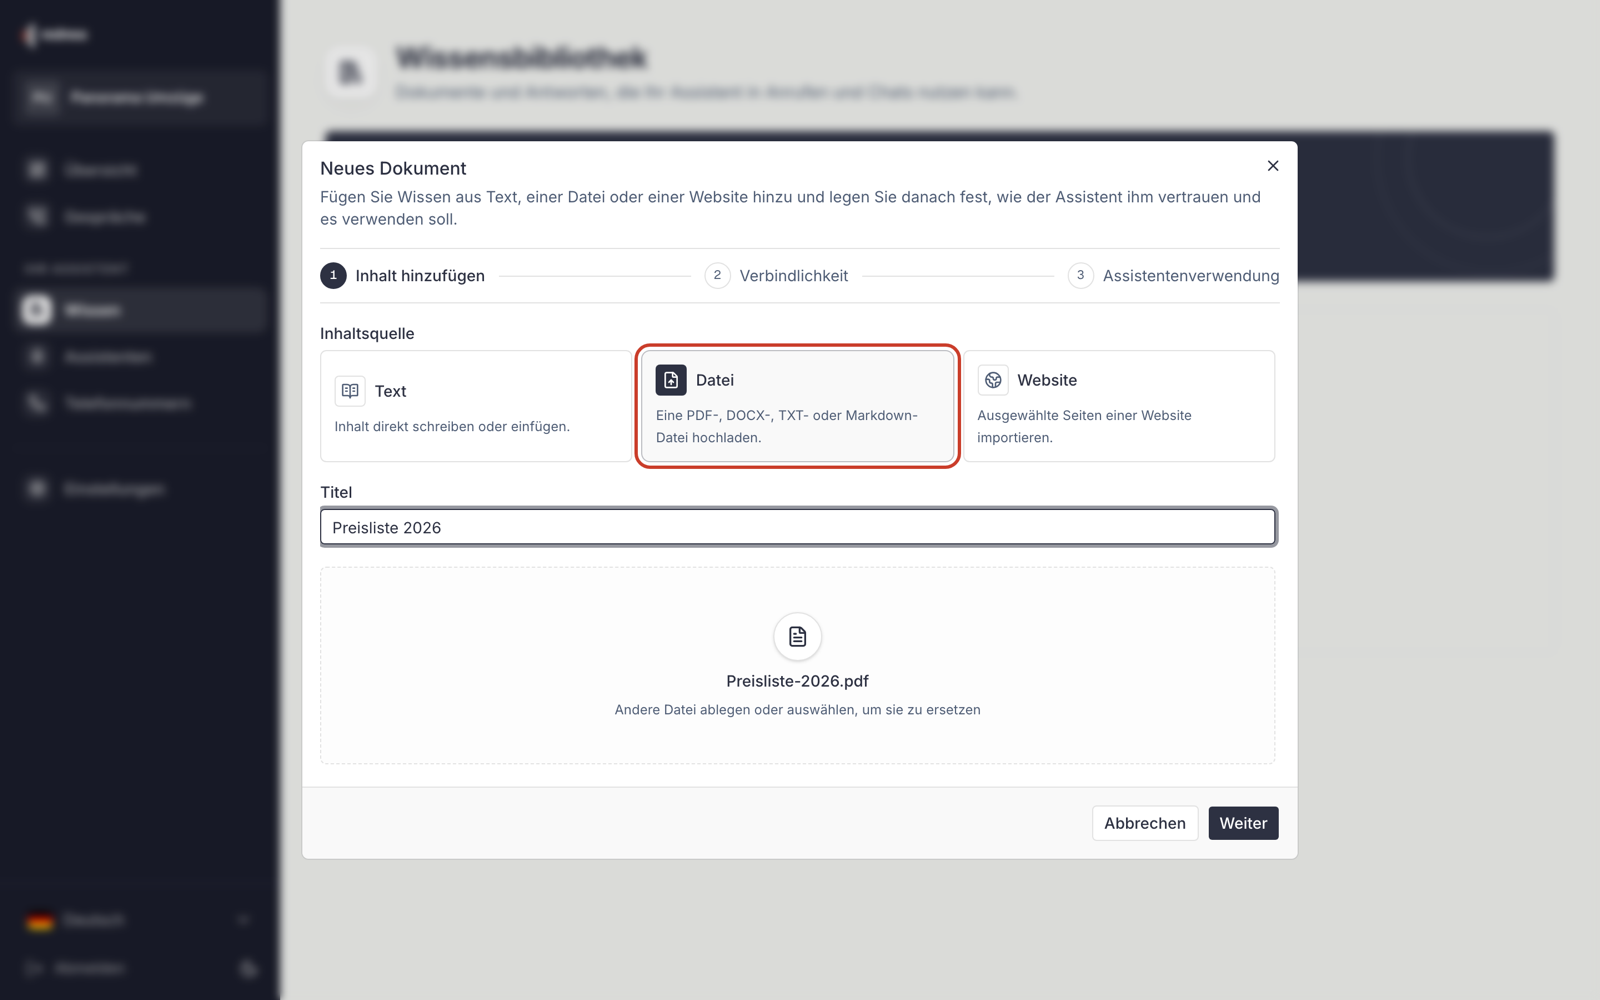
Click New document. A window with three steps opens: Add content, Knowledge authority and Assistant use.
Under Content source, choose where the knowledge comes from. There are three options.
Option A: Upload a file
For price lists, menus, information sheets or your FAQ as a document.
- Click File.
- Drag the file into the field, or click in it and select the file.
- The Title field fills with the file name. Change it if necessary, for example to "Price list 2026". The title helps you to find the document again later.
- Click Continue.
Good to know:
- PDF, DOCX, TXT and Markdown up to 15 MB are allowed. If your file is larger, save the PDF with a lower image quality or split it into more than one file.
- Files with real text work best, for example a PDF that you exported from Word. With scanned pages or photos, rednea must first recognise the text. Then check the result very carefully (see step 4).
Option B: Type the text directly
For short facts and frequent questions that you do not have as a file.
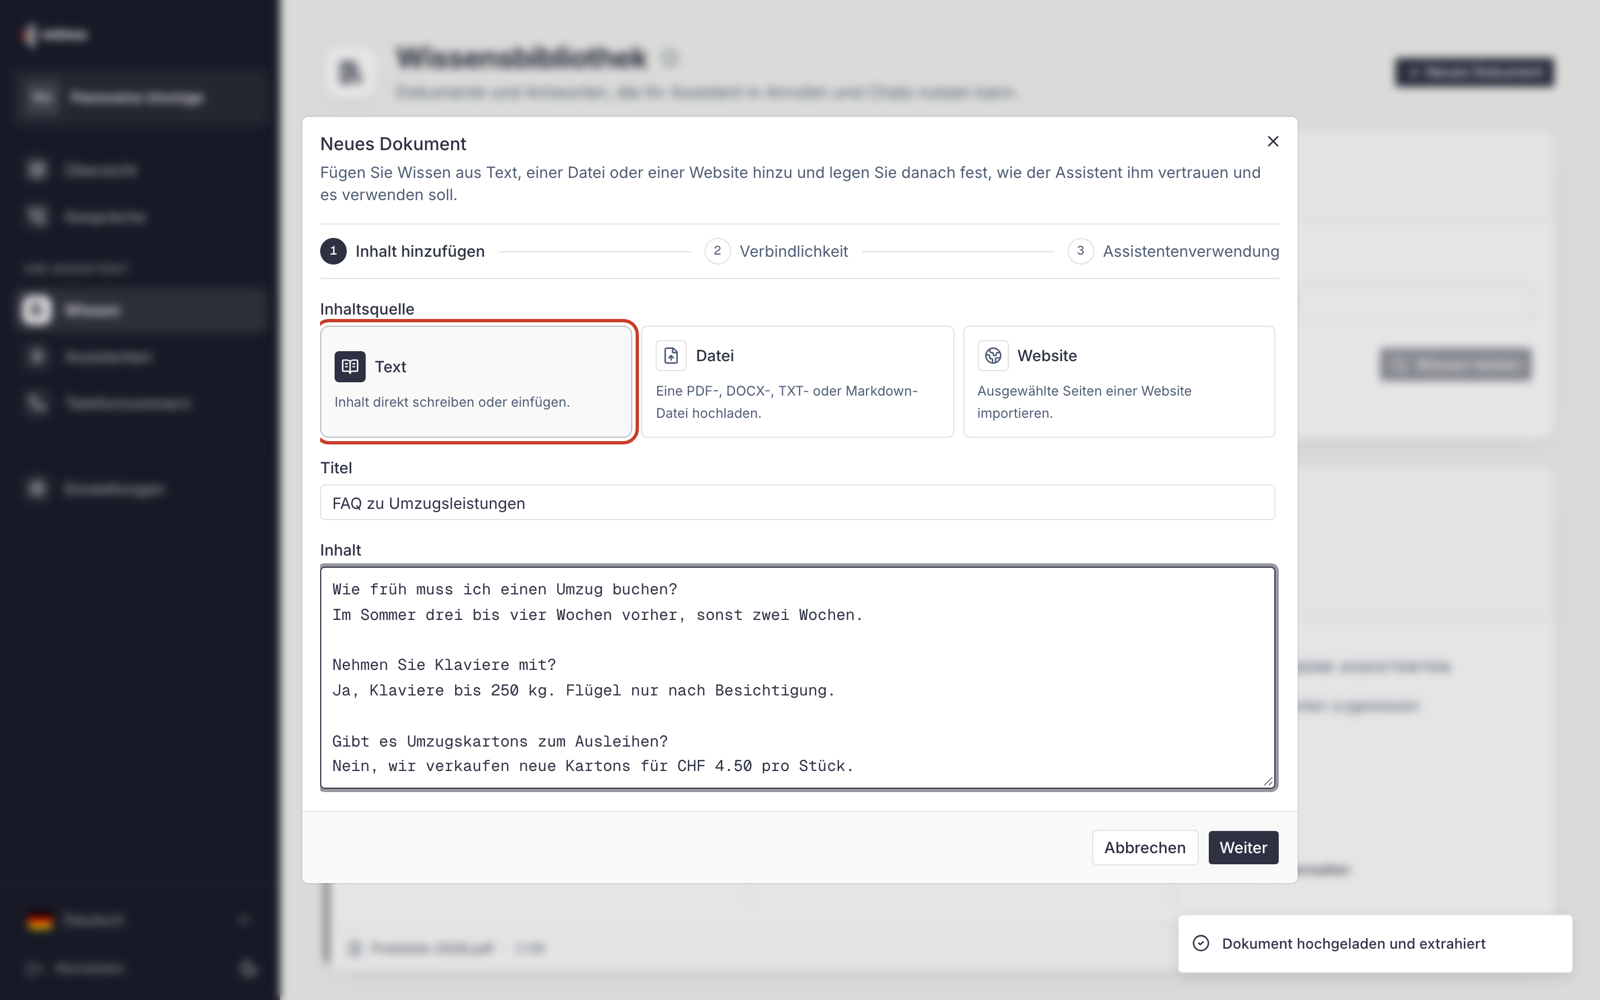
- Click Text.
- Enter a Title, for example "FAQ about our removal services".
- Write or paste the content in the Content field. Question and answer work best, with an empty line between each pair.
- Click Continue.
Option C: Take over pages of your website
For content that is already on your website.
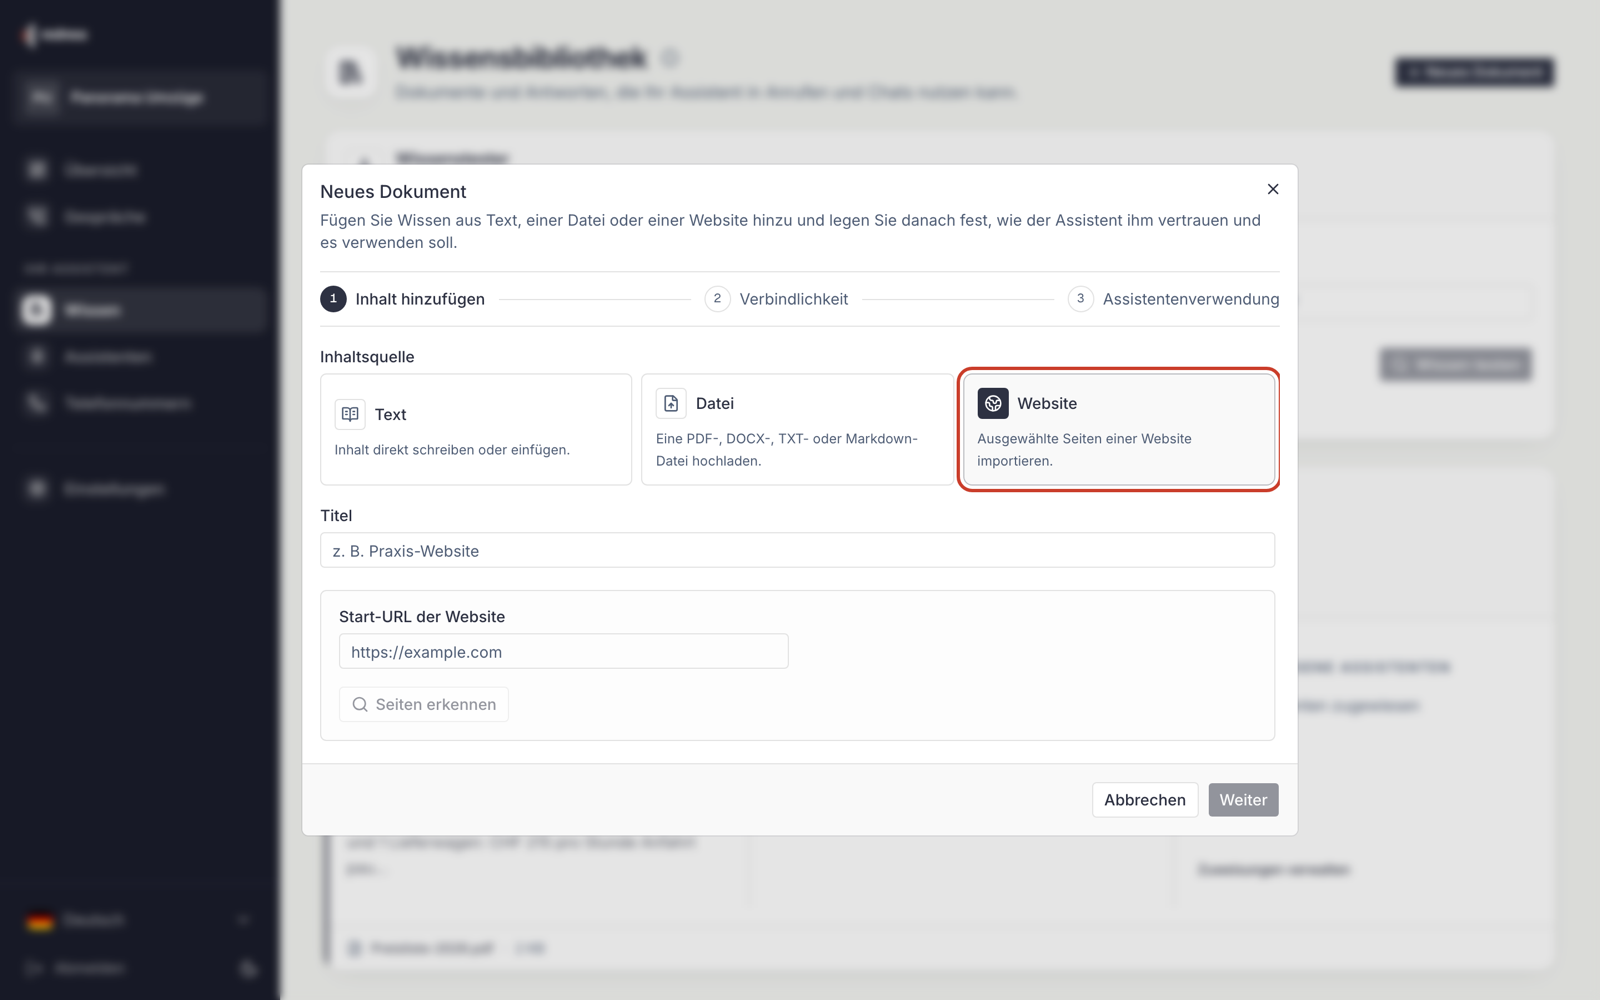
- Click Website.
- Enter a Title, for example "Website".
- Under Website start URL, enter the address of your website, for example https://www.your-company.ch.
- Click Discover pages. rednea shows a list of the pages it found. Important pages are already selected.
- Select the pages that the assistant must know, for example services, prices and contact. Up to 10 pages per website are possible.
- Click Continue.
rednea checks the selected pages each week. When something changed, a new draft is made. Your assistant continues to use the published version until you publish the new draft (step 6).
Step 3: Set the authority and the use
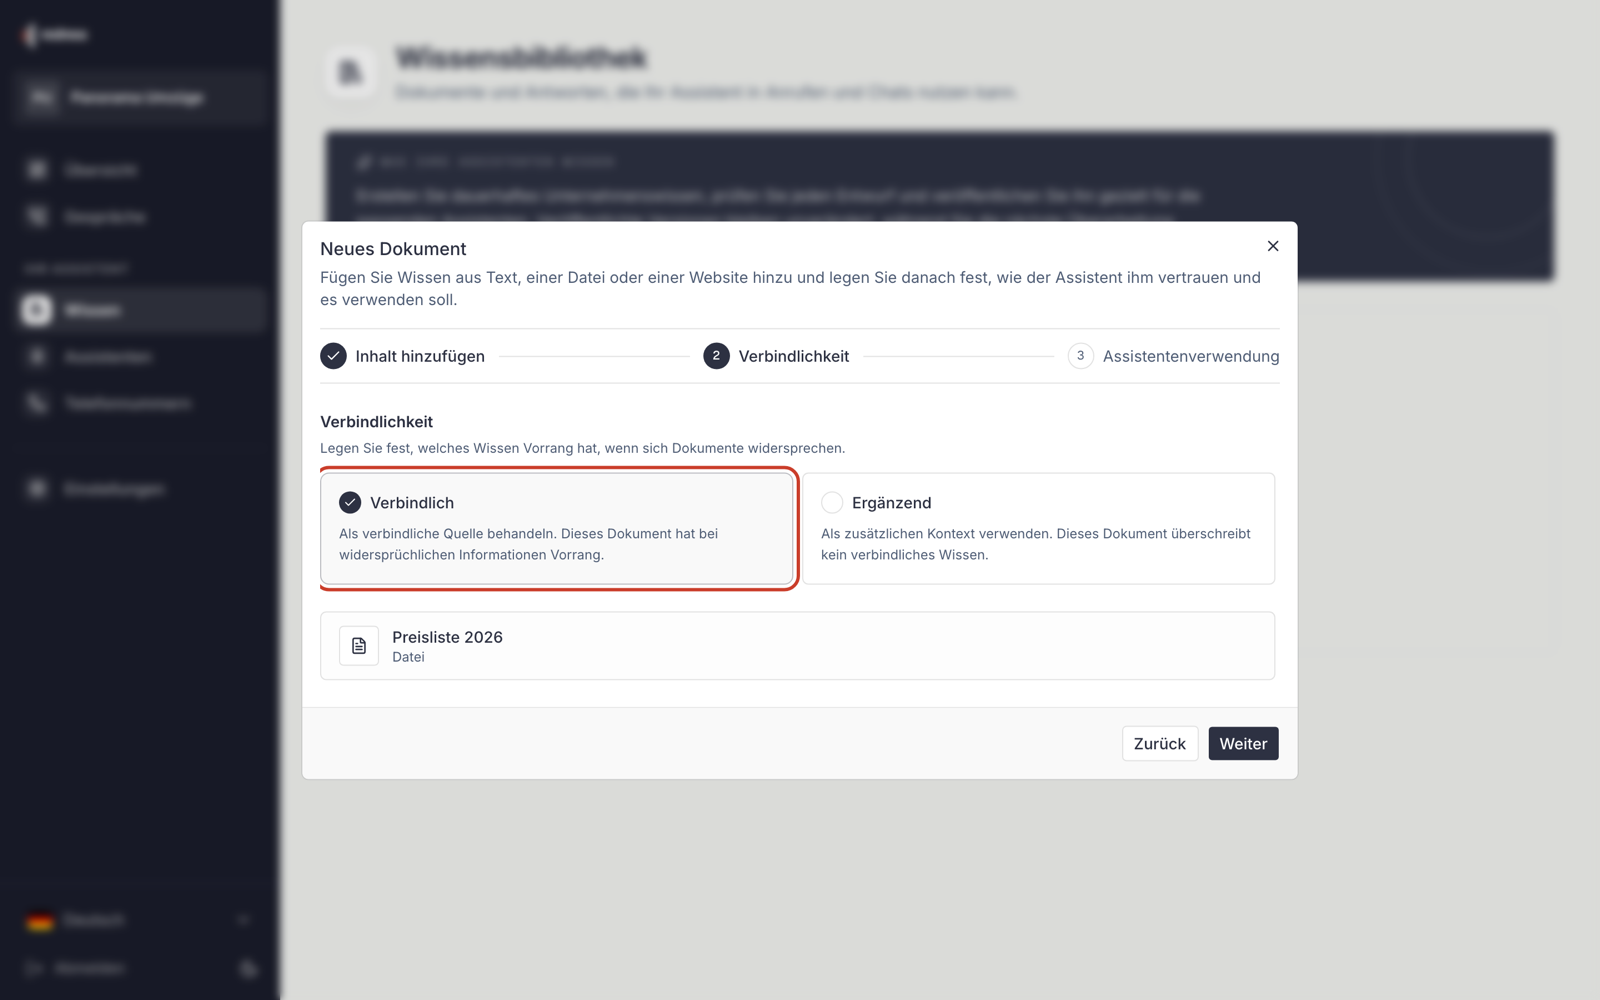
Knowledge authority sets which document applies when two documents contradict each other:
- Authoritative: The document is a reliable source and has priority. Choose this for your official price list, your opening hours or your rules.
- Supplemental: The document gives more background but does not override authoritative details. For example an older brochure or general information.
Choose one option and click Continue.
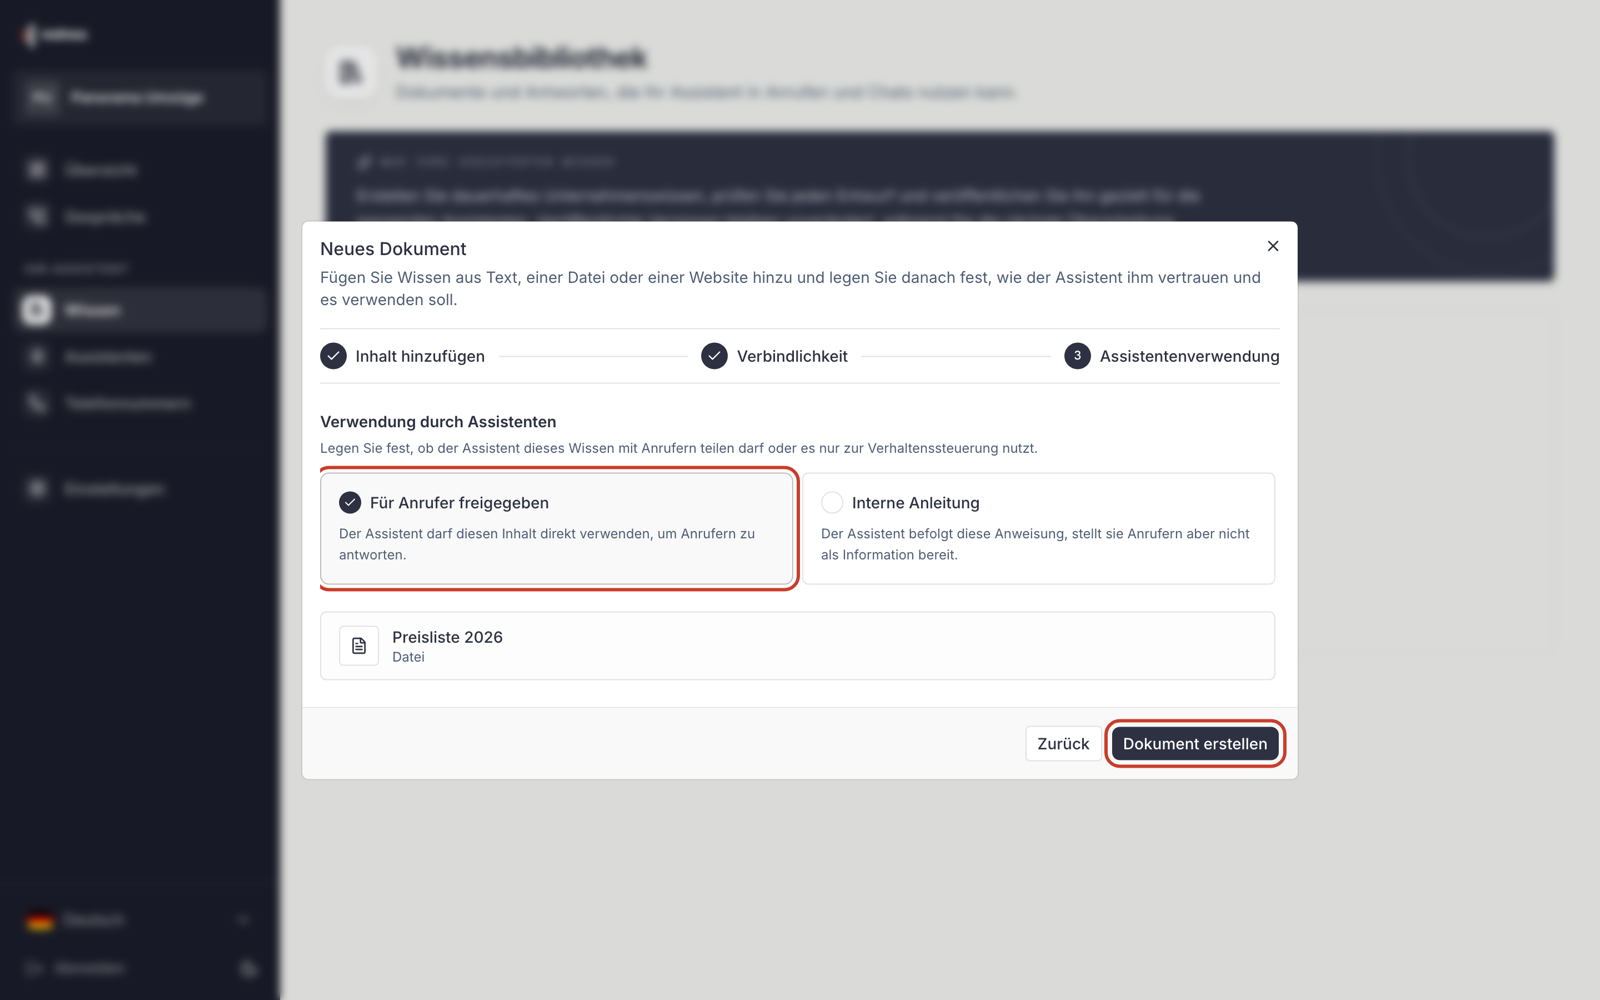
Assistant use sets whether the assistant may tell the content to callers:
- Caller-answerable: The assistant may use the content directly to answer questions. This is the right choice for prices, services, menus and FAQs.
- Internal guidance: The assistant follows the content but does not tell it to callers. For example "For moves abroad, always suggest a site visit". Internal notes thus stay internal.
Choose one option and click Create document.
rednea now reads the content. For a large file, this can take a few seconds. Then the document is in the library.
Step 4: Check the draft
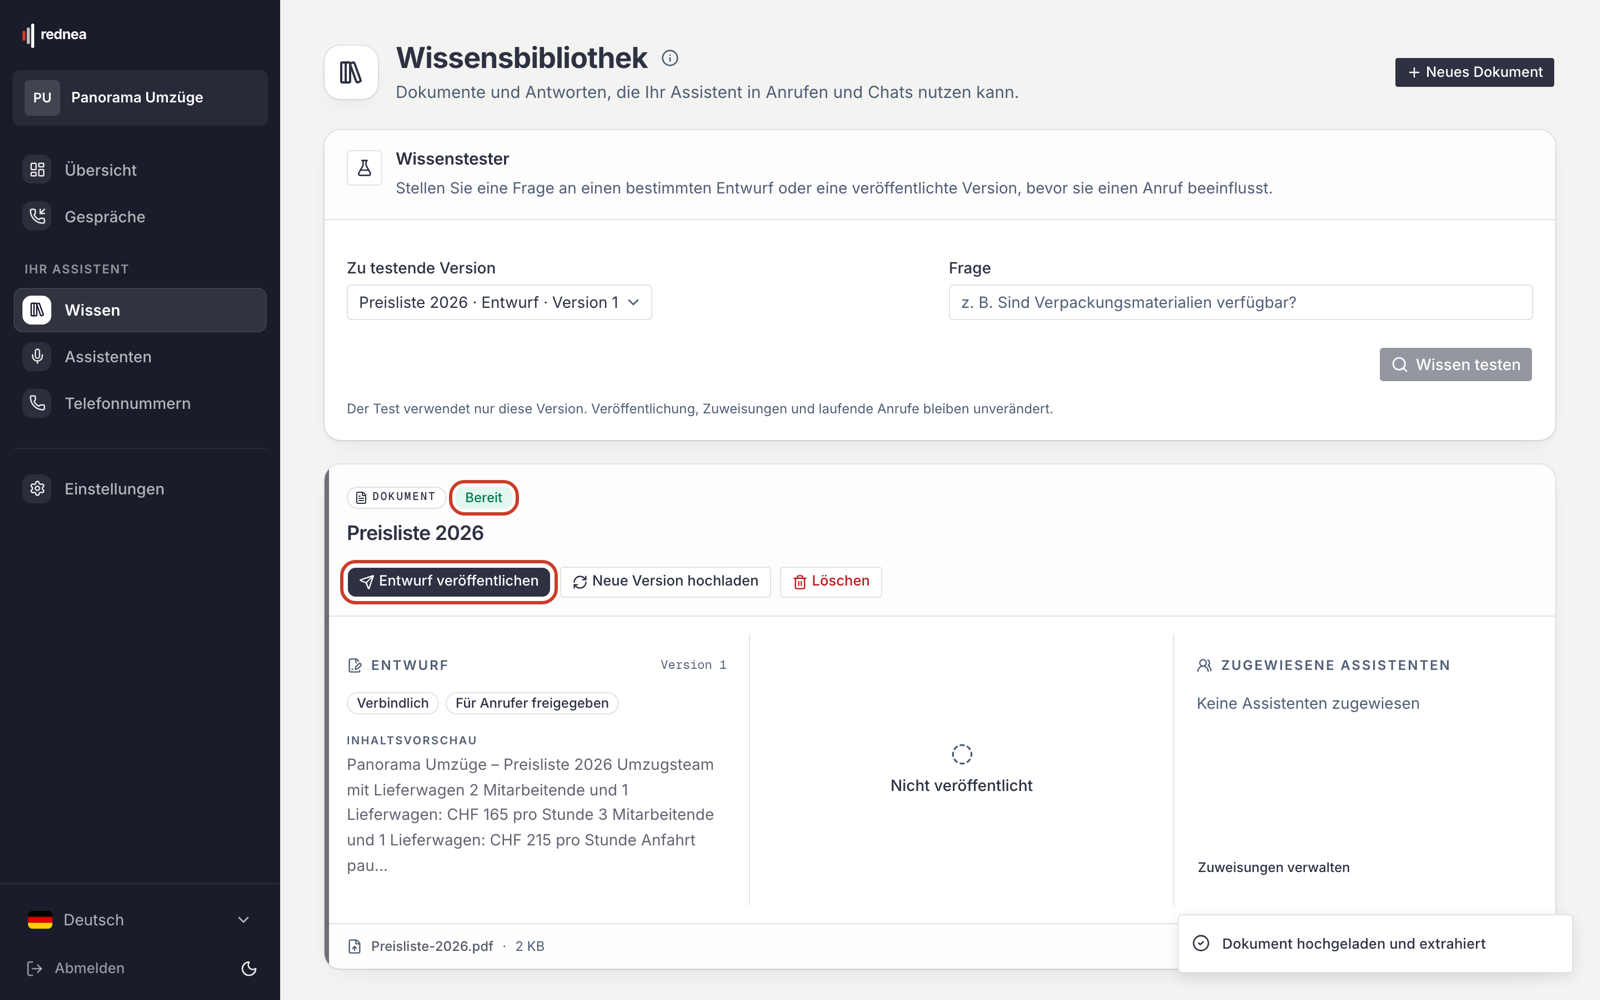
The new document shows as a Draft. At the top left you see the status:
- Ready: The content was read completely.
- Needs review: A part was difficult to read, for example a scanned page or a table. Check the content before you publish.
- Failed: No usable text could be read. Upload a better version of the file or enter the content as text.
Under Content preview you see the start of the text that was read. Check that prices, numbers and names are correct. For PDFs with scans, there is Improve extraction at the bottom right: rednea then reads the document again more precisely and makes a new draft.
At this moment, the right side still shows Not published and No assistants assigned. So your assistant does not know the document yet.
Step 5: Try it with the knowledge tester (recommended)
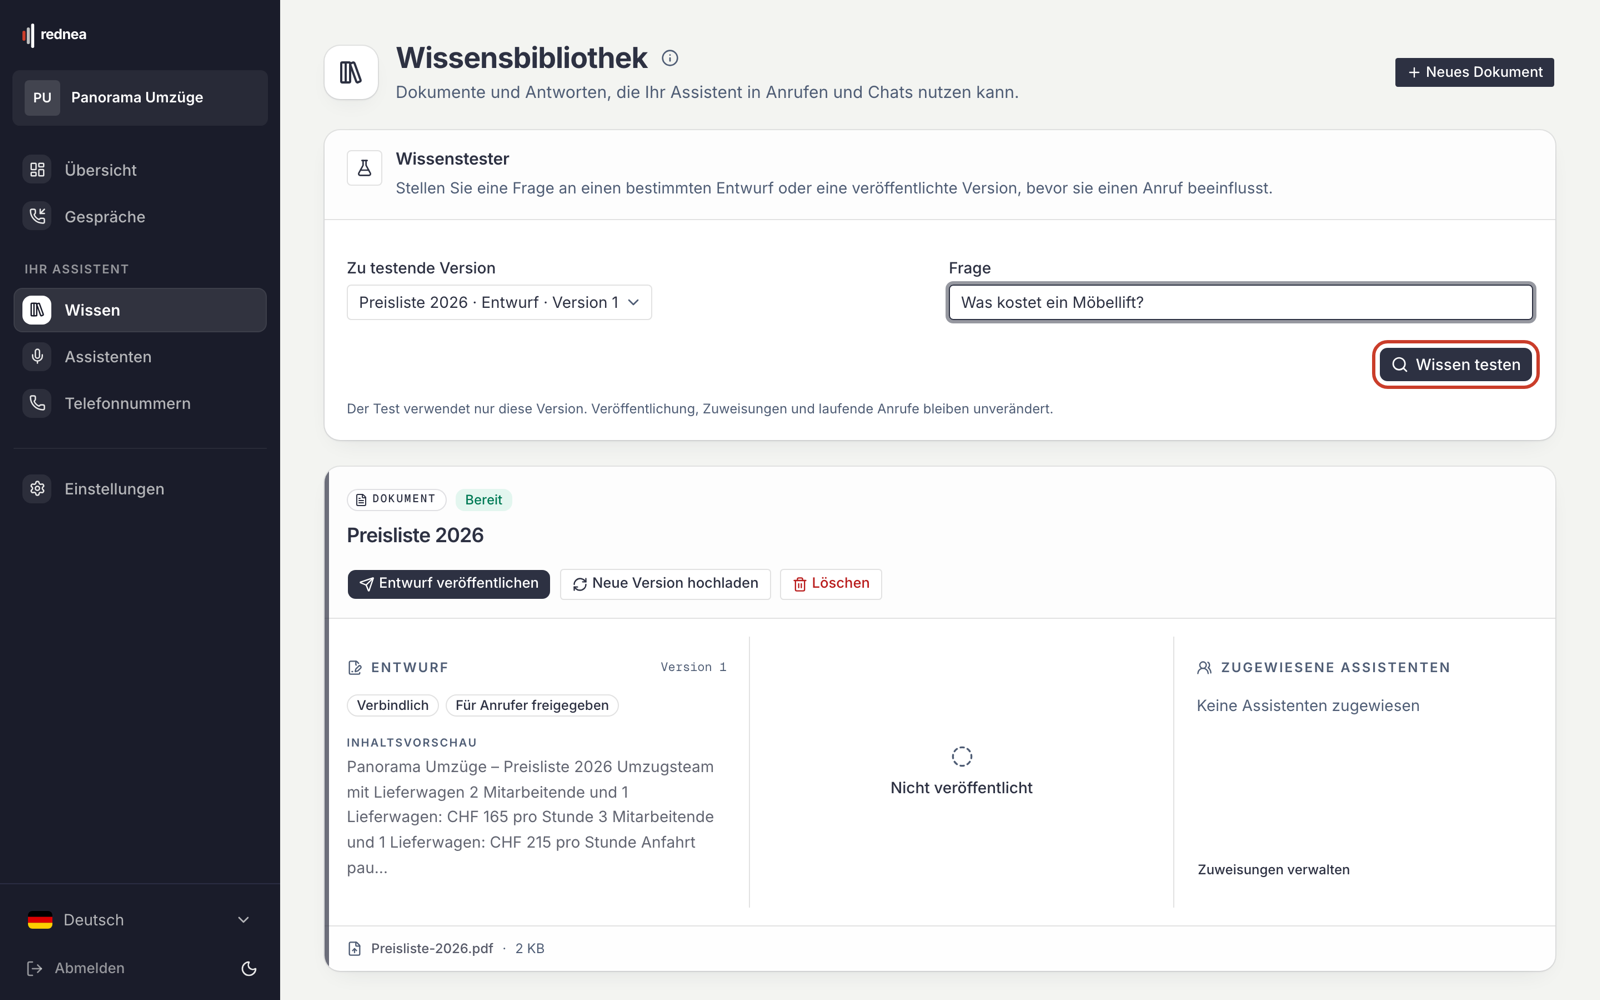
With the Knowledge Tester you ask your document a question before it has an effect on a call.
- Under Snapshot to test, choose your document.
- Under Question, write a question as a customer would ask it on the phone, for example "How much does a furniture lift cost?".
- Click Test knowledge.
You see a Proposed answer and below it the area Selected evidence: the passages from your document that the answer is based on. If it shows No adequate evidence, the assistant finds nothing on this question. Then add to the document. The test changes nothing in your calls.
Step 6: Publish the draft
Click Publish draft. After a moment, the Published column with the version shows on the right.
If rednea shows notes about the extraction, read them, tick "I reviewed the extracted content and understand these warnings." and click Acknowledge and publish.
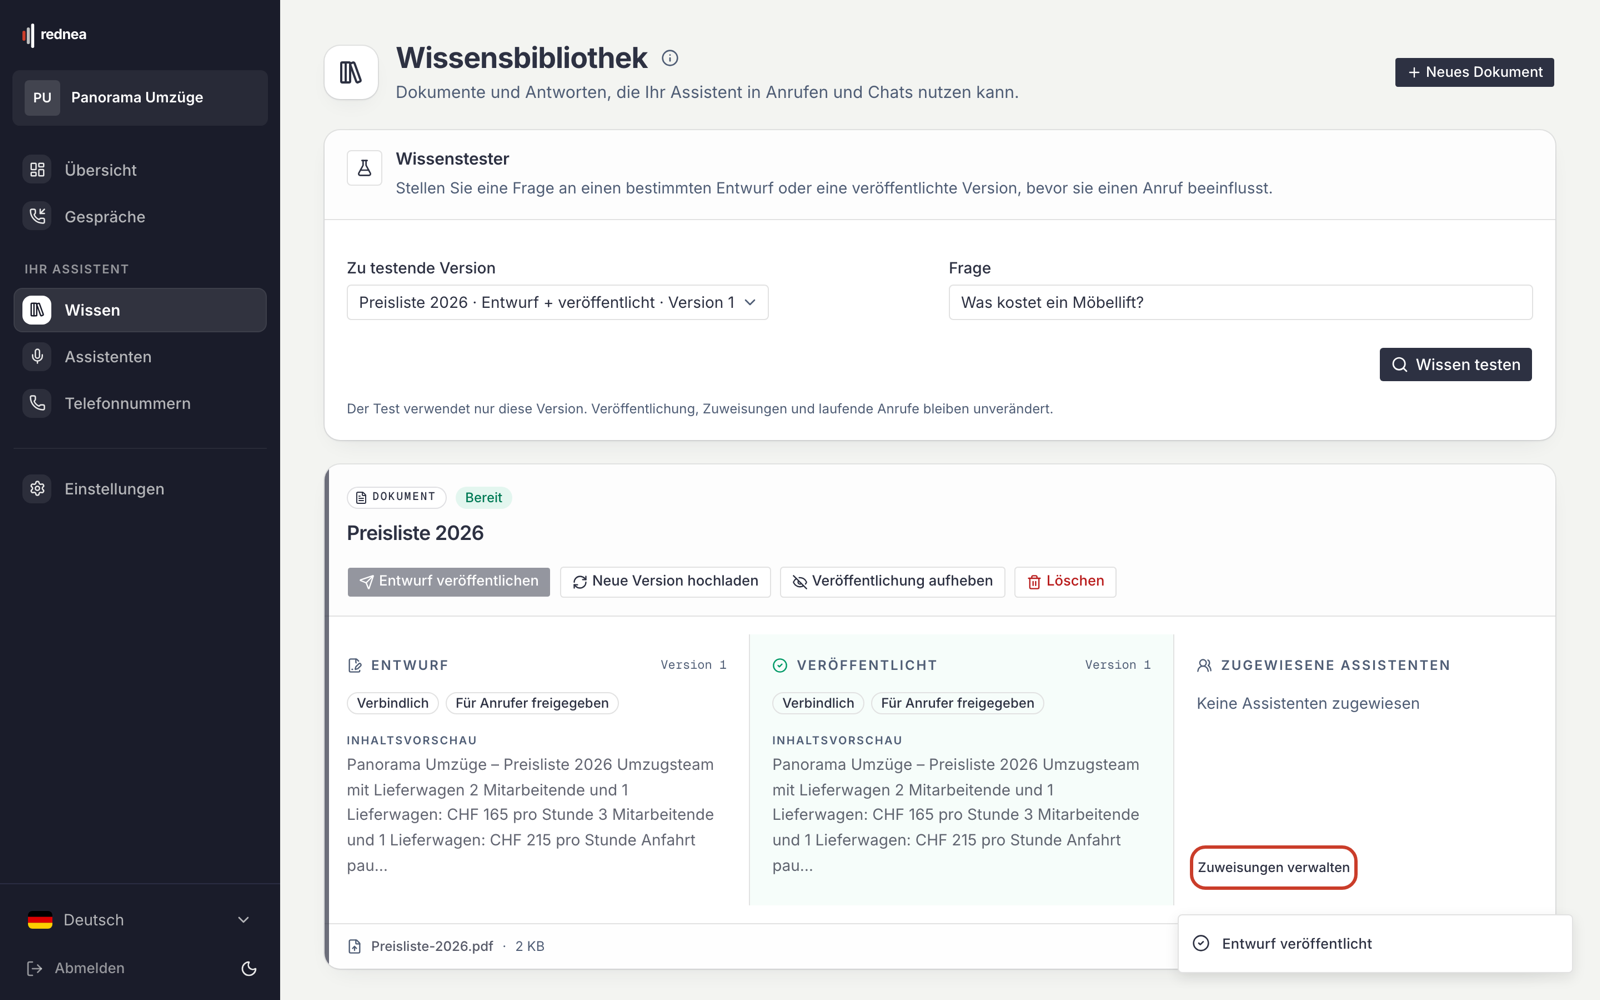
Step 7: Assign the document to your assistant
This is the step that people forget most often. Without an assignment, no assistant uses the document, also when it is published.
- In the document, click Manage assignments on the right.
- In the Assign to assistants window, click each assistant that must use the document. A tick shows that it is selected.
- Click Save assignments.
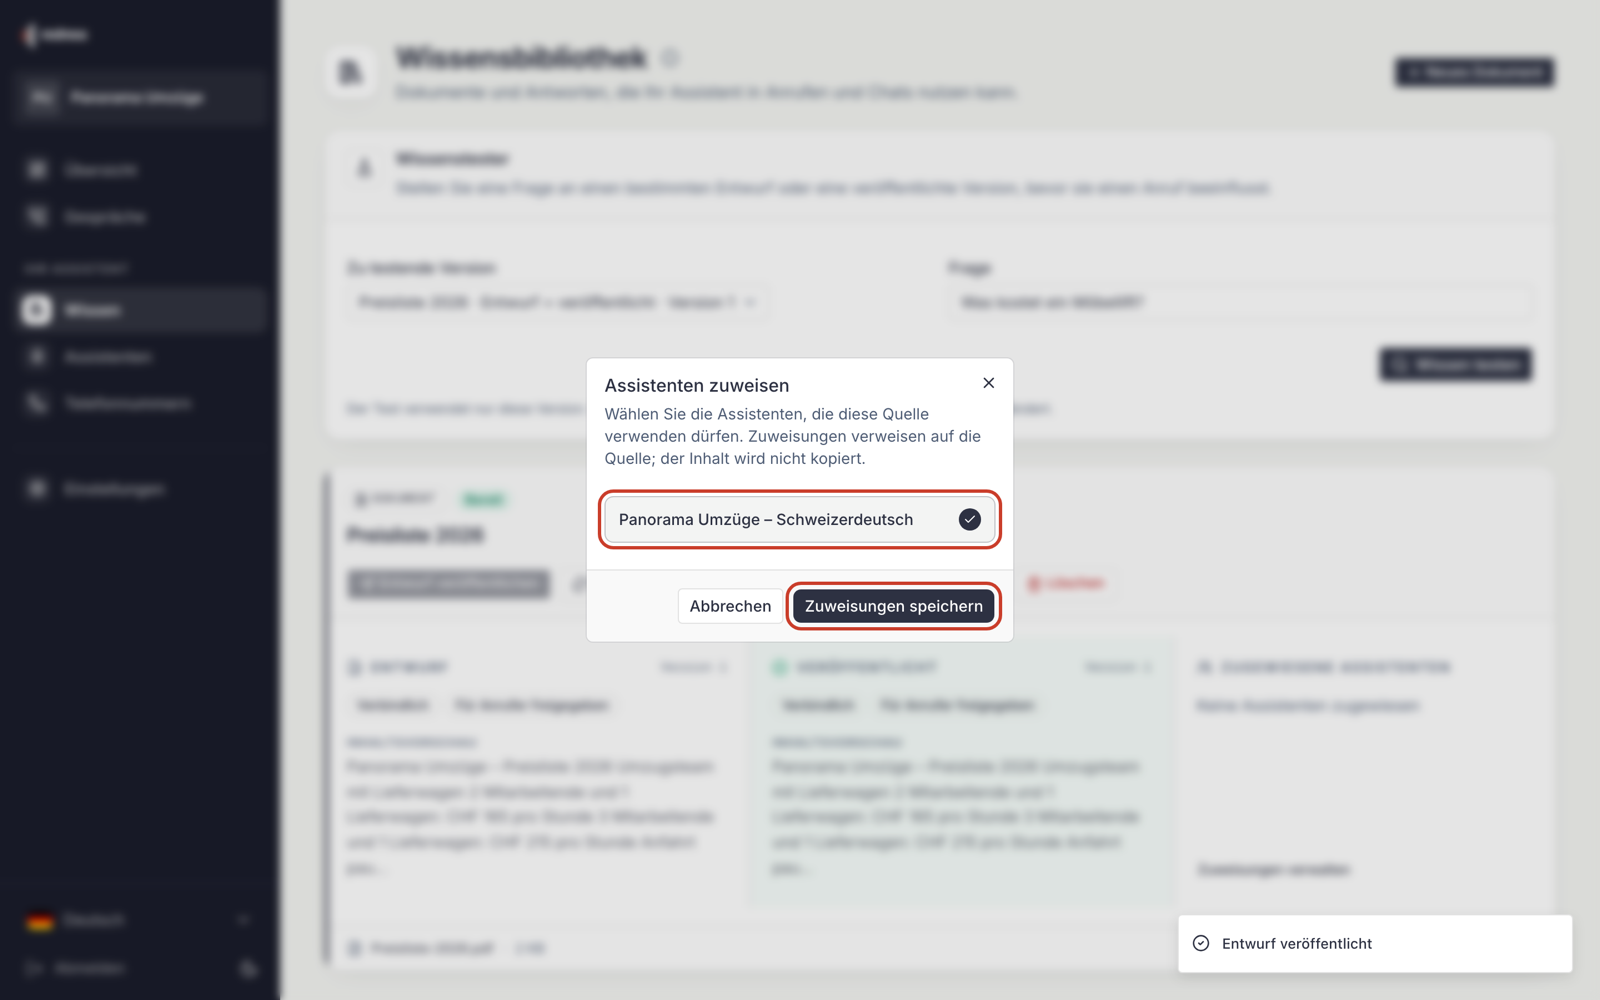
Under Assigned assistants, the name of your assistant now shows. The document is now active.
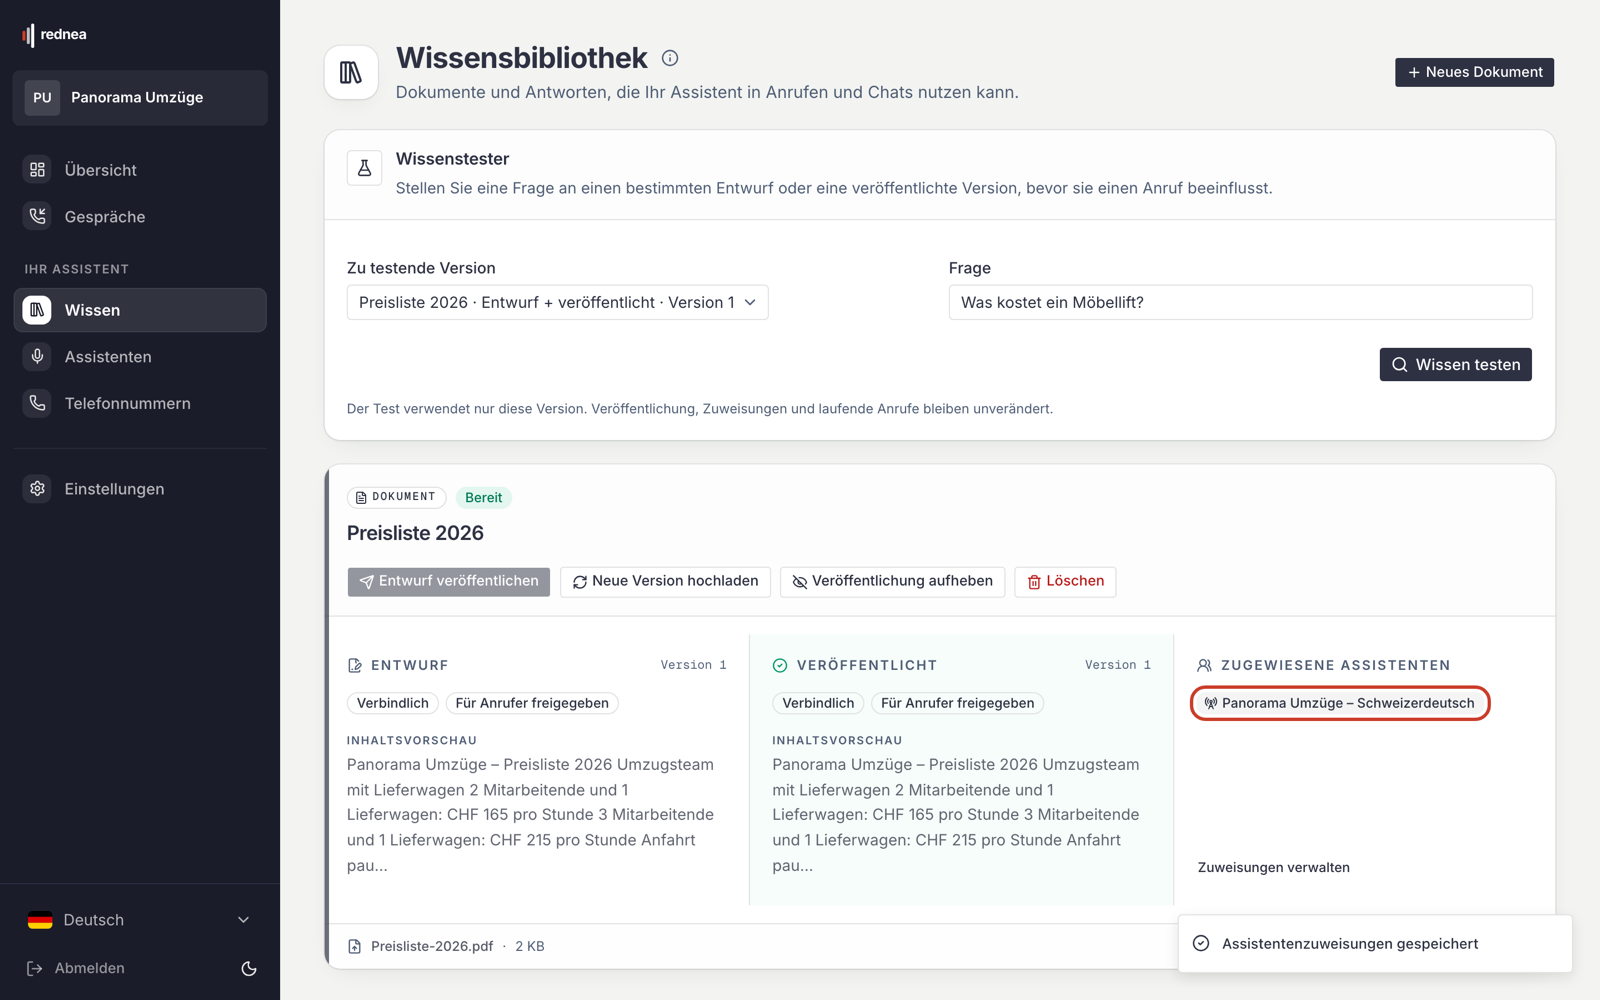
If you have more than one assistant, for example one for German and one for French, assign the document to each one that must know it.
Step 8: Check with a test call
Call your rednea number and ask a question whose answer is in the document. The assistant looks it up quickly and answers with your details. The lookup usually takes only one to two seconds.
Important:
- Changes apply from the next call. A call that is in progress keeps the knowledge that applied at its start.
- When the assistant finds nothing in your documents on a question, it does not guess. It says that it does not have this information and helps in a different way if possible, for example with a callback note.
- Check the Instructions of your assistant (in the left column Assistants → your assistant → Instructions tab). If they say for example "You do not know the menu" or "Do not give prices", the assistant follows this, also when the document contains the details. Change such sentences.
Keep a document up to date
- New file, for example next week's menu: In the document, click Upload new version, select the new file and click Upload and extract. A new draft is made. Your assistant continues to use the old version until you click Publish draft. The assignment stays; you do not have to make it again.
- Change text: For a text document, click Edit draft, change the content, save, and publish the new draft.
- Switch off for a time: With Unpublish, no assistant uses the document any more. But it stays in the library, and you can publish it again later.
- Remove permanently: With Delete and the title typed in to confirm. You cannot undo this.
When a message shows during the upload
| Message | What to do |
|---|---|
| The file is too large to upload (maximum 15 MB). | Save the PDF with a lower image quality or split it into more than one file. |
| This file type is not supported or the file is damaged. | Save as PDF, DOCX, TXT or Markdown and upload it again. |
| The file is empty. | Select the correct file. |
| The file could not be transferred. | Check the internet connection and try again. |
| The file arrived but could not be processed. | Try again. If the error stays, contact us. |
| This Business cannot process documents at the moment. | Your subscription is not active. Check it under Settings, Subscription tab, or write to us. See Invoices, payment and subscription status. |
Tips for good answers
- One topic per document. One price list, one FAQ, one menu. You then find changes more quickly, and the assistant finds the right passage.
- Clear, complete sentences. "Furniture lift up to the 6th floor: CHF 290 per job" is better than a table without headings.
- Add dates when something applies only for a given time, for example "Menu from 26 to 30 October".
- Replace old versions instead of making a second document with similar content. When two documents contradict each other, the authoritative one wins.
Frequently asked questions
Must I change my instructions so that the assistant uses the knowledge? No. As soon as a document is published and assigned, the assistant looks things up by itself. Only remove sentences that contradict this (see step 8).
What goes into the knowledge library, and what into the instructions? The Instructions say how your assistant must behave: greeting, tone, which details it takes down. The Knowledge Library holds facts to look up: prices, services, menus, FAQs. More in Setting up instructions for your assistant.
Can the assistant also book appointments through the knowledge library? No. The assistant books appointments through your connected calendar. How to connect it is in Connect your calendar to rednea.
Does the caller see my documents? No. The assistant only uses the content to answer. It does not pass on documents with Internal guidance at all.
If you have questions, or if something does not work as expected, write to us at info@rednea.ch.
Related articles
Still have questions?
Write to us — we're happy to help. Or listen to a live demo right in your browser.